
Indexing on Kindex
Updated 26 March 2020
Indexing Tools
Kindex indexing tools add data to your records enable them to be sorted, searched, and shared. These guidelines outline how you can index your records on Kindex by adding Record Info (metadata), transcriptions, and tags.
Transcription
Kindex provides a built-in, easy-to-use transcription to so searchable data can be added to your family records, including documents, letters, photos. A transcription is an written copy of what is written or spoken in an original record. In the case of a written document, you type what you see. If there is no text found on the record (such as a photo), you can add a description of the photo using the image tool. In the case of an audio or video record, you type you hear.
Note: these are general guidelines only. Kindex Archive Owners may have specific indexing instructions for their archives which may or may not match our guidelines.
The Transcription Screen
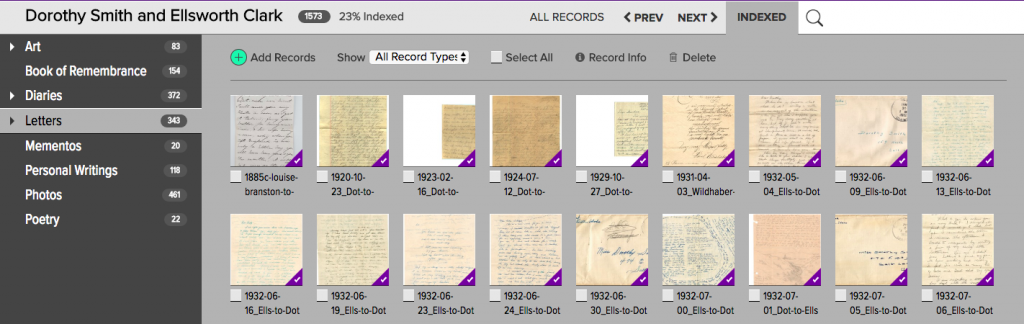
On the top of your transcription screen you will see three buttons to help you view your records:
- All Records. View all records, including records unindexed, in progress, or complete
- Indexed. View completed, indexed records only.
- Not Indexed. View all records that are 1) not indexed or 2) indexing in progress

Note: “All Records” shows records whose transcriptions are not started, in progress, and complete. All records opened from this view are opened in the transcribe screen so that records and transcriptions may be viewed side-by-side. To read transcriptions only, open records from the “Indexed” view.

Save work before continuing to the next record. Note the Indexing status button below the transcription window. If a record’s transcription is done, click Complete.
Software Note: In order to ensure your transcription status is saved, please save your work after changing indexing from “in progress” to “Complete”. It may be necessary, make a small edit (or add a space) in your transcription to activate the Save button.
Transcription Buttons

Text editor button functions
| |
Record Info | View and edit the record’s Title, Record Type, Category, Person, Description, Keywords, Provenance, and Date |
| Undo | Undo your last action | |
| Redo | Redo your last action | |
| Strikethrough | Format transcription to match strikethrough text in original. Highlight word or phrase and click the Strikethrough button. | |
| Underline | Format transcription to match underlined text in original. Highlight word or phrase and click the Strikethrough button. | |
| Inline note | Use when record has text inserted within a line. Highlight the text above the line and click the inline note tool. | |
| Marginal Note | Use for notes written in the margin or otherwise not part of the flow of the document. Marginal notes appear as footnotes within the record. Highlight the text above the line and click the inline note tool. | |
| Image | For records that contain images, or for records such as photos, use the image tool to add a description of the image within the transcription. Images are numbered in the case of multiple images on a page (as found in scrapbooks). You may also delete an image description box. | |
| lllegible text | Use when you are unable to transcribe a word or phrase. To mark an area that has illegible text, place your cursor where the text should be and click the illegible text button. | |
| Table | Add a table to organize your transcription data | |
| Page Break | To add a page break, click this button. | |
| Bold | New! Bold text. | |
| Italic | New! Italicize text. | |
| Indent | New! Indent paragraph. | |
| Outdent | New! Outdent paragraph. | |
| Align | New! Change paragraph alignment. | |
| Bullet | New! Make a bulleted list. | |
| Numbering | New! Make a numbered list. | |
| Help | Click the Help button to get indexing helps and guidelines. |
Transcription Guidelines
- Type the words you see. Your transcription text should mirror the original, even if there are mistakes. For example:
- Keep original spelling and grammar, even if it is incorrect. If you wish, you may spell out the correct word within brackets. Doing this helps clarify the text and enhances searchability while maintaining the integrity of the transcription.
- Keep name, place, and date abbreviations as they are, even if you know who or what the abbreviation represents. You’ll have a chance to clarify exactly who, when, or where later in the tagging step.
- Match content, but not appearance. While your text should match the original content, don’t attempt to format your transcription to match the source record appearance. For example:
- When typing a paragraph of text, do not force lines to break at the same place they break in the original record. If you must force a line break within a paragraph, such as a break between two lines of an address, you may do a “forced” or “soft” return (shift + return). This will create a line break without spacing between the lines.
- In the area where you type your transcription, all text is left-aligned. If you are transcribing text that is centered or right-aligned, do not attempt to match the alignment of text by adding spaces to the text.
- Do not add multiple line breaks to add space between lines, even if there is space in the original record.
- Transcribe all text. Transcribe all the text you see, even if it’s crossed out. However, don’t add information that is not there. Stick to what you see.
- What if you’re not sure? If you are unsure about anything in your transcription, you can make a note or comment in the comment field below the transcription window. If you must comment within in the transcription area, be sure to place it within brackets [ ].
User Comments
Users may want to add comments or insights to transcriptions or descriptions. We recommend the user of brackets in order to identify the contributor and separate these comments from the original text. See example below.

Other Indexing Tools
Record Info
Record Info in Kindex is the metadata attached to a Kindex record. This macro data helps Kindex sort and search the record using its name, record type, or title. Kindex Record Info includes:
- Collection. The collection ( aka folder) where the archive is located on your archive
- Attach to. The primary person (usually the record creator) you are associating with this record
- Record Category. The general record type
- Title. The title of the record. Note: records added in batches keep file name as record title.
- Description. A general description of the record
- Keywords. Words that describe the contents of the record
- Provenance. The trail of ownership of the record
- Date. The date of the record (partial dates and date ranges coming soon!)
- Place. The location where the record was created
- Source (coming soon!)

Record Info can be added:
- When adding a record or batch of records
- When selecting a record or batch of records in thumbnail view and clicking Record Info

- When indexing a record

How is Record Info Used?
- Searching. Record Titles and Descriptions are searchable

- Sorting. Records can be sorted and viewed by Record Type

- Exports. Record Info is included in XLS and CSV archive data exports

Metadata From Other Sources
Embedded Metadata. Many record types contain metadata added to their file properties. When you add your records to Kindex, your embedded metadata is preserved and not stripped out. Because of the variance of these types of records and data, Kindex does not yet extract embedded metadata. However, the ability to leverage all metadata and add that to what is searchable on Kindex is a feature we plan to make available in 2018.

FamilySearch Metadata. Memories imported from FamilySearch retain their original Titles and Descriptions.
Tag
Software Note: We will be making some enhancements to our tagging features, including person tagging. In order to implement these updates, we will be temporarily removing access to our tagging tool beginning on June 1, 2018. Tagging features should be restored by July 1, 2018.
Record tagging is a way to add information to your record that would otherwise not be found through searching the Record Info or Transcription. Tagging records also helps connect your records to other databases. For example, you may tag the word “he” in a letter as “Ellsworth Clark”.
Access the Tag Tool
- Go to the “Indexed” screen
- Open an indexed record to read the transcription

- Click “Tag Transcription” on the left

Tag Screen and Buttons

 |
Person Tag | Highlight a name or pronoun to tag a person. Choose from people already in your person list or add a new person. |
 |
Place Tag | Highlight a location in your transcription and add a place tag. |
 |
Date Tag | Highlight a date in the transcription and add a standardized date. |
Adding Tags
To add a tag:
- Highlight the text you want to tag
- Select a person, place, or date tag
- Add the info, and click Add
Note: Our Tag tool is in beta. Further enhancements to use tags to search, sort, and connect records are forthcoming.
For related articles on indexing, transcription, and metadata, check out these articles on the Kindex blog: